The forced approach procedure is first learned when training for the private license, and is continued in commercial training. As flying experience is gained the natural progression leads nicely to the power off 180 exercise. The power off 180 approach and landing procedure requires you to glide to the runway and land with accuracy with idle power from the downwind.
Once a pilot has mastered better airplane handling during a glide, which is practiced during a forced approach, an actual landing can be taught to meet landing requirements with more precision.
Purpose of the power off 180
The purpose of the power off 180 is to protect the airplane if an engine failure occurs in the circuit, typically 1000′ AGL, and is practiced at the aerodrome. It is also known as engine failure in the circuit. It’s simply a procedure that tests the ability to land with precision, as you’re doing it from a glide. If you think it’s difficult, it is – but hardly impossible. Remember that in a glider every landing is a power off landing.
Practical applications
The application of learning this procedure is being able to land safely if you have an engine failure while in the circuit. It begins from circuit height: 1000 feet AGL. It tests airplane handling skills, and can be achieved after some flying experience is gained. The more hours you’ve accumulated, the better your handling skills should be. The more hours you have, the better you understand how your airplane will perform, glide, sink, how to understand and plan for different wind scenarios will affect it the glide.
Over time, with practice, you can become proficient in how to effectively control airspeed and get the airplane down to where you want it to go.
The power off 180 procedure
Flight test standard
This procedure is tested during the commercial flight test. In it, you must yourself decrease power to idle, abeam your touchdown point, quickly establish best glide speed, and not forget carb heat (if a carbureted engine) or your engine warm during descent. One engine warm is allowed and not below 500 feet. You must announce where you will touch down, and it must be on the first third of the runway. Your tolerances are touch down within +400 or -50 feet of your announced touchdown point.
The engine warm is important especially in the winter. It keeps the engine from getting too cold or it may fail to respond when power is required. This keeps the engine temperature normal and prevents spark plug fouling which can occour from prolonged idling.
How to fly the power off 180
Do your pre landing checks
Before starting the procedure, complete your normal pre-landing checks just like you do for every landing. Ideally, this should be a flow that you have established for yourself. In the Cessna 172, you can start with the fuel selectors (both), carb heat on, mixture full rich, oil pressure in the green, positive pressure on the brakes, seat belts on (for yourself and all passengers), doors and windows closed and latched, all items tied down in the back.
Power to idle abeam touchdown point
From the downwind leg in the circuit when you are abeam your touchdown point, pull power to idle. Like mentioned above, if you have a carburetor, add carb heat first before decreasing power, this is is a part of your pre landing checks so this should already be done, but doesn’t hurt to double check it.
Your instructor or examiner will note where you pulled the power, and expect you to touch down between +400 and -50 feet of it, so you should get used to judging where you will touch down.
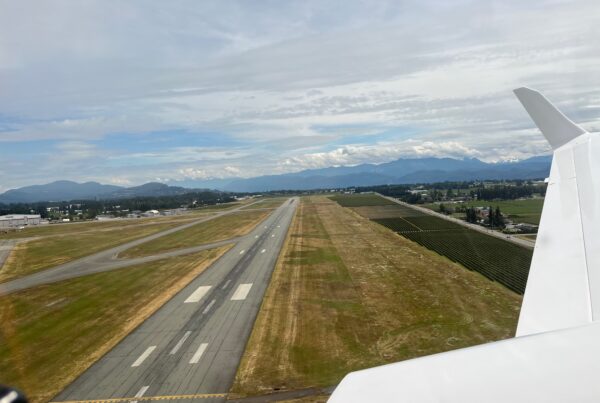
How to choose a touchdown point
On the runway I was practicing on, there are 1000′ and 500′ markings. Additionally, the centrelines are 200′ apart, so that can also be used to judge distances. Typically I would pull power idle abeam the 1000′ markers, so that would be my aim or touchdown point.
This means I had to touchdown on the 1000′ markers and at the most at 1400′ – so two centreline markers past the 1000′ markers, and at the least, at 950′, which would amount to approximately three quarters of the distance past the last centreline marker.
Note the major difference in overshoot and undershoot tolerances: you can be up to 400 feet past your touchdown point but only 50 feet before it. This tells you it’s better to be long than to be short, so plan for it in your approach.
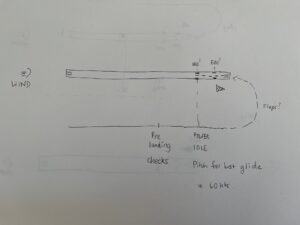
An example how to fly the power off 180 from runway 35 in Springbank Airport.
Understanding float
We all know that our airplane will float after the flare. It’s important to understand your airplane to know how much it will float. Typically these are known numbers with no flaps and for all the different flap settings. Remember, if we’re too fast we’ll float further, and sail past our touchdown point. Flaps will also increase our float distance.
Turn towards the runway
Depending on the winds, you’ll want to make your turn towards the runway pretty much right away after decreasing power to idle. Set your attitude to get your airspeed, so you remove workload from constantly having to chase your airspeed. Stare at your touchdown spot and assess your descent rate.
Flight test tolerances
For purposes of the flight test, you are allowed some deviations. Your airspeed must be within -5 to +10 knots within the target speed. In the 172 I flew the target was 65 knots, so the tolerance was 60-75 knots. You must also touch down within -50 or +400 feet of your chosen touchdown spot.
You have to be precise. Anywhere within that range your mark will go from a “4” to a “3”, and outside the range you can be assessed a “2” or less. Remember, you’re only allowed a total of four flight test items assessed at “1” or “2”, before you partial your flight test. For more detail see the Transport Canada flight test guide.
Too fast?
If your airspeed is too high, get on it right away. Raise the nose to bleed off some excess airspeed. Remember airspeed is energy, so if you come in too fast you’ll flare and float much longer, bypassing your intended touchdown point.
Too high?
This is definitely something you can fix by adding a slip or flaps to increase your descent rate.
One way to consider flaps is they are your main tool to control the descent. They are really all you have, since you should keep your same attitude (and power setting) throughout to avoid gaining or loosing your best glide speed.
When to add flaps
When you do add flaps keep in mind what this will do to both your sink rate and airspeed. Don’t add them when you are too low or on the desired descent path. You won’t always need them if on the proper path, and once you turn to short final you’ll have a good idea whether you will need them or not.
Remember flaps increase your sink rate, so you can use them to get down quicker. It’s better to be too high than too low, too high we can always do something about it, such as use a slip or add flaps, once we are too low, this can be very dangerous, particularly if we have wind shear or landing into a tailwind.