Posted on

Wake turbulence

Have you seen the movie Argo?

If you have seen the movie Argo, and are a pilot, you know how unrealistic the scene is with the fleeing airliner near the end of the movie.  Though Hollywood pulls some highly impossible stunts, this one is really over the top in terms of how grossly impossible it is, and I’m sure I’m not the only one who noticed.  If you fly you probably picked up on it right away.  Cars chasing a 747 on the take-off roll? Right behind those engines which are operating at maximum thrust? They should be blasted into the taxiways.

Chasing a departing 747 in a Jeep is just a bad idea.

Jet scene from Argo. Image courtesy of  ropeofsilicon.com
Jet scene from Argo. Image courtesy of ropeofsilicon.com

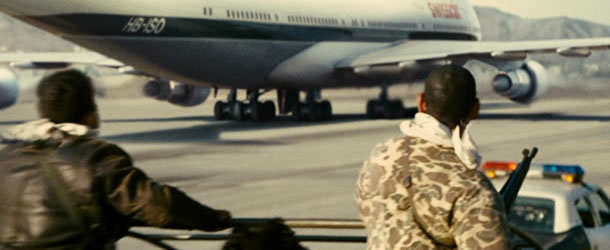
At the end of the movie, a fleeing 747 airliner is taking off rescuing U.S. diplomats during the Iran hostage crisis in 1979.  Once officials realized that these people were on the plane, they proceeded to chase after the plane while the plane was already on the takeoff roll. On the take off roll planes are at maximum power settings and the engines are pushing out a substantial amount of air. Maximum thrust in fact, is in excess of 50,000 lbs.

In a 747 aircraft, such as the one involved in the movie rescue has a take-off speed of about 155-160 knots (depending on load, field elevation, altimeter setting and temperature)  – that’s 290 km/h and 184 miles/h.  The first inaccuracy is that these cars are actually keeping up with the plane to the point it rotates.  Old Jeeps in the 70’s keeping those speeds? Very interesting.

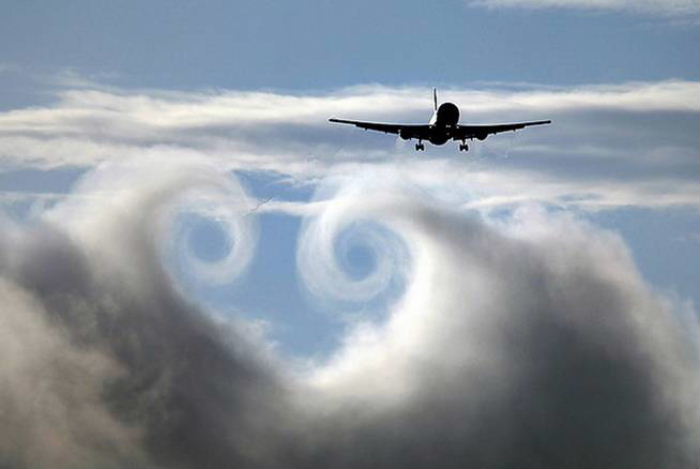
The second problem with this depiction is the creation of wing-tip vortices or wake turbulence.  When a plane is accelerating down the runway, the engines are at full power,  set for maximum thrust.   As speed increases, air passes over the body of the aircraft faster and faster. Due to the cambered shape of the wing,  the shape of the wing causes the air on top of the wing to travel faster  than the air at the bottom of the wing. Because of Newton’s third law, the faster speed causes an area of low pressure at the top of the wing, and an area of higher pressure at the top of the wing.  This causes lift.

Airflow. Image from From the Ground Up, page 21.

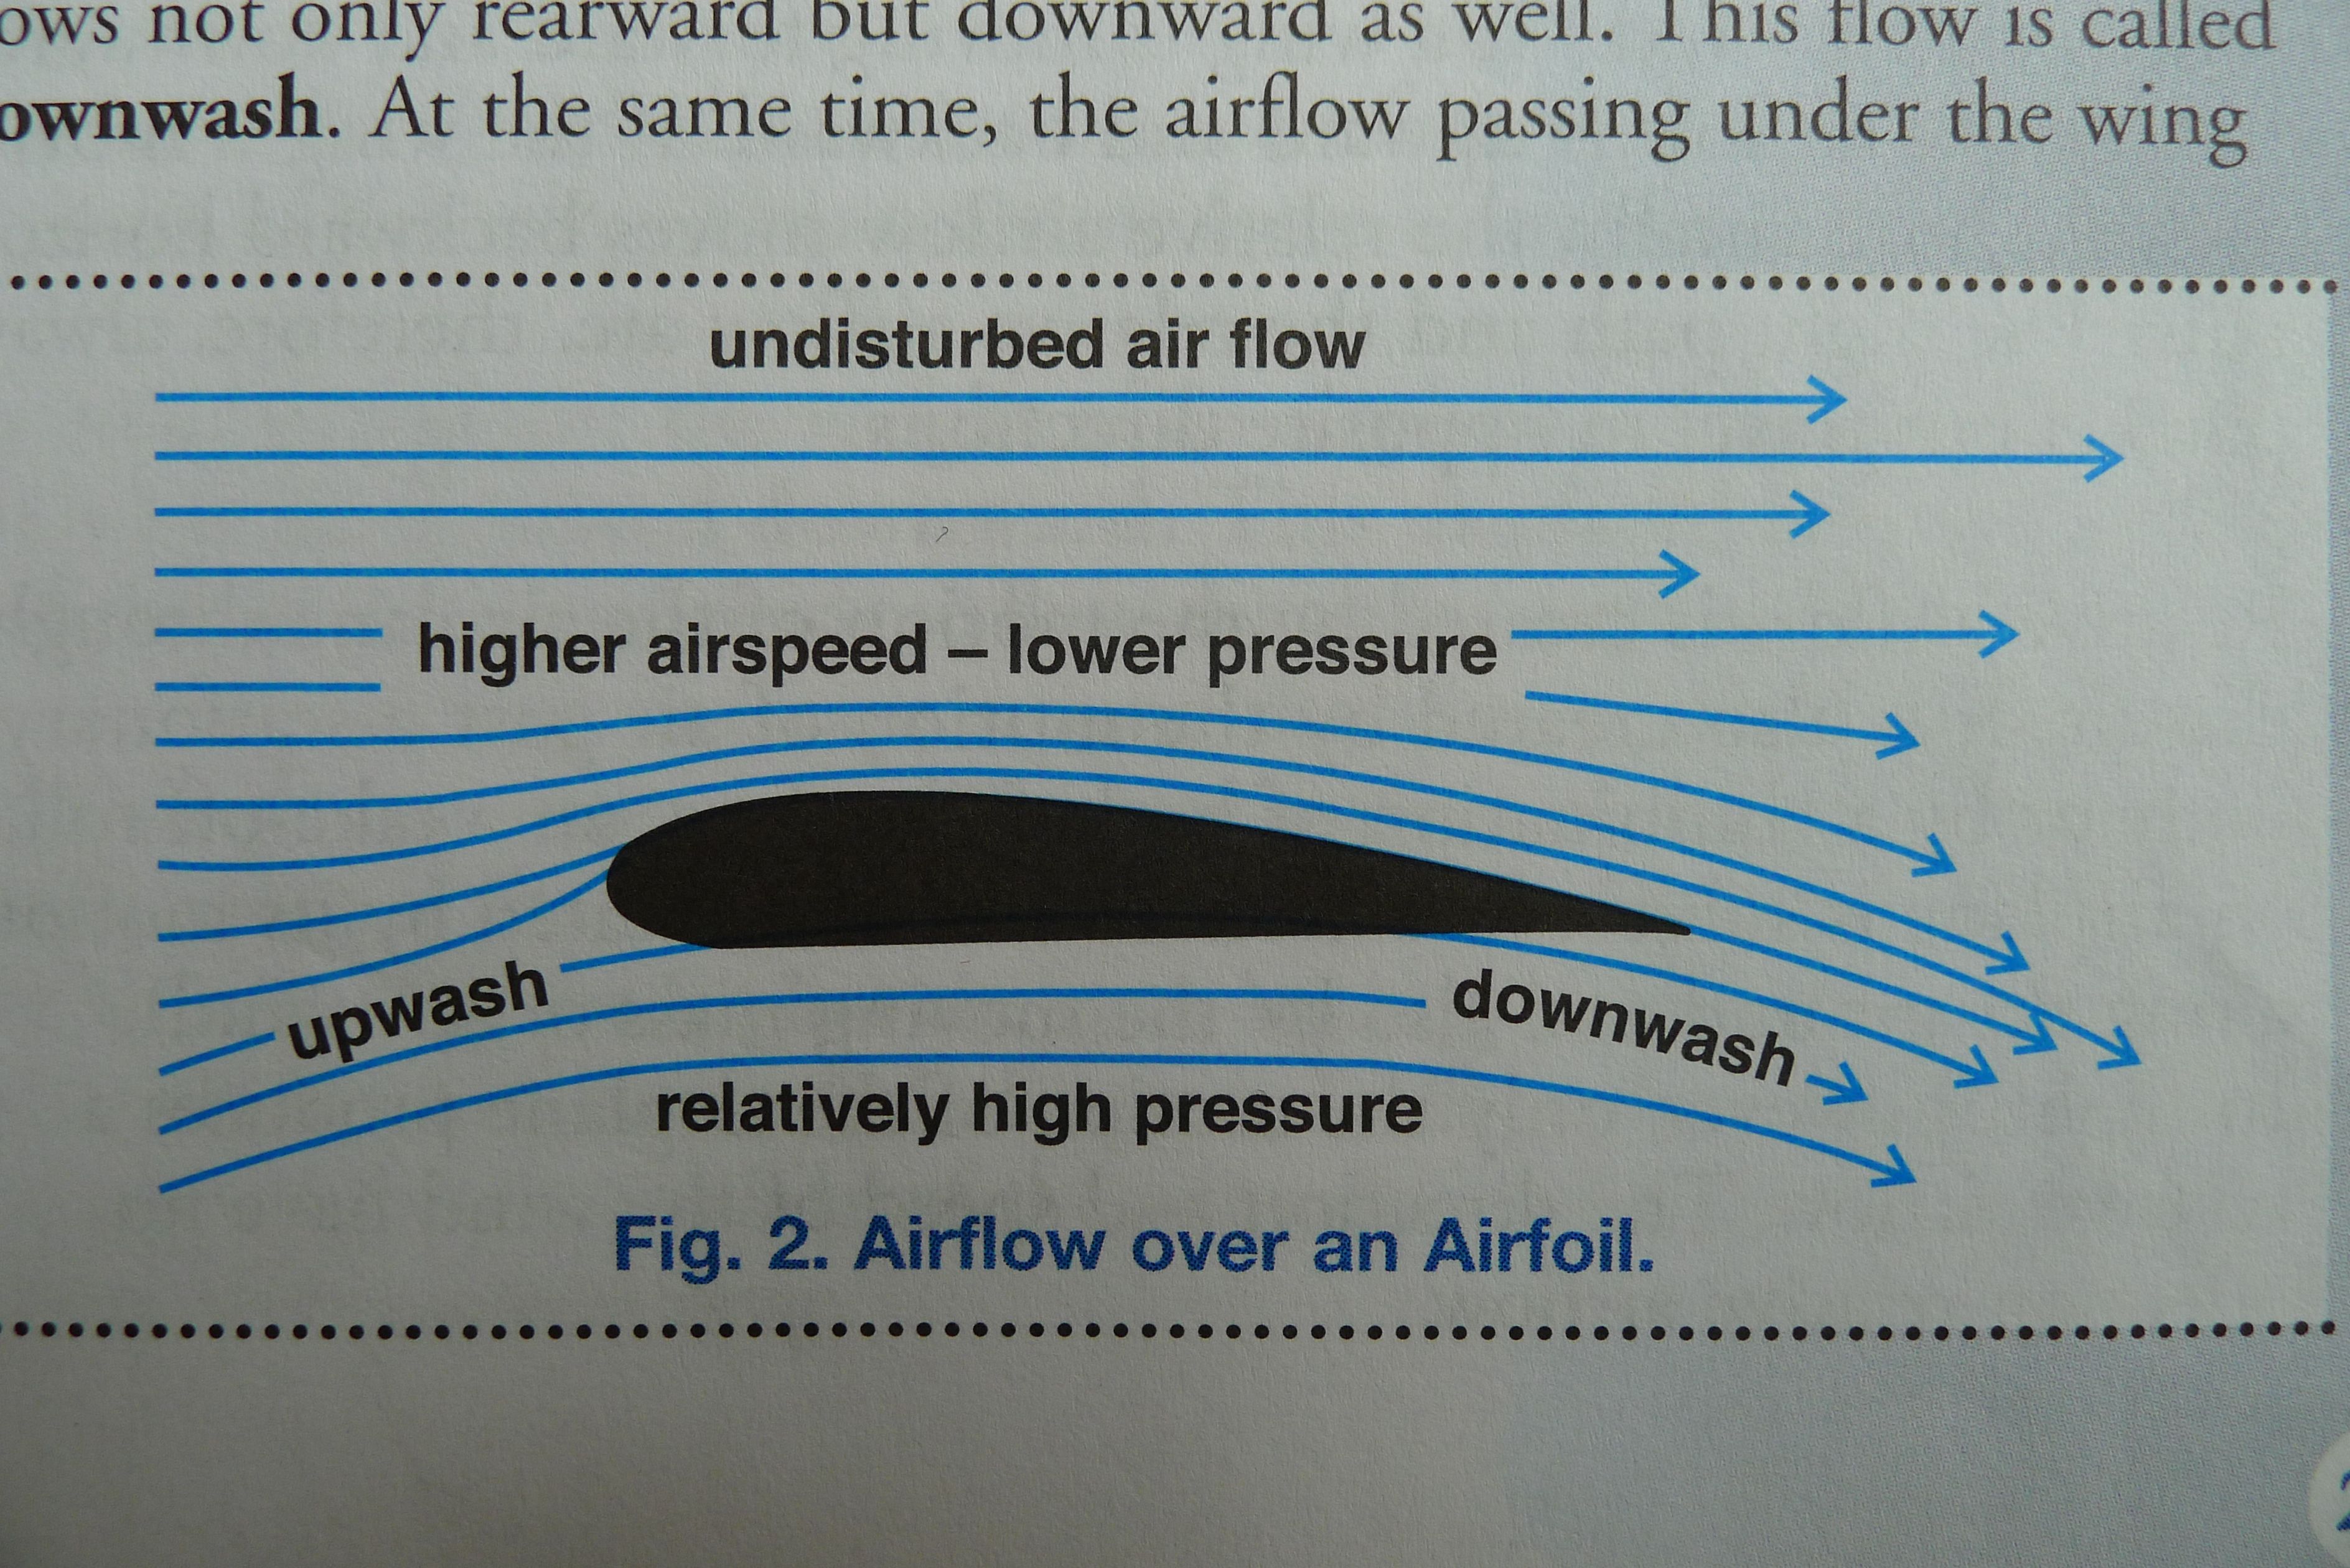
Also as air travels over the wing, it travels downwards as well as rearwards, causing downwash. Air traveling at the bottom of the wing is also deflected downward by the bottom of the wing.   This also contributes to creating lift.

Since the decreased pressure at the top of the wing is less than the atmospheric pressure around it, air over the top is deflected inward; air on the bottom of the wing is greater than the pressure of the air around it, hence it is deflected outward and curls upward over the wing tip. 

The two airflows unite at the trailing edge of the wing, creating eddies and vortices that unite into one large eddy at each wing tip, called wingtip vortices.

The heavier the airplane, the greater the span loading on the wing, the more air will be displaced downwards and the greater vortex will be generated.  The vortex created from a  Cessna 172 will be substantially smaller than one from a 747.  Anything caught in the path of the vortex will tend to roll with that vortex.

Vortices are a by product of lift. Image from Nature.com

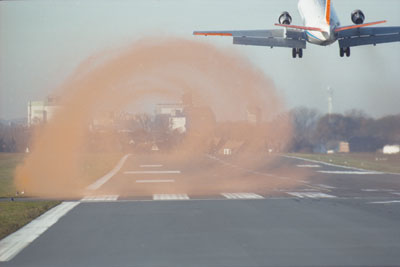
Since vortices are a by product of lift, they are only produced when the aircraft is in flight. Hence when the 747 jet takes off, it will start producing these vortices naturally.  Anything that is in the path of these vortices will be rolled – so if those vehicles in the movie were standing in the path of the vortices they should have ended up flying in all directions.

This is why many airplanes are now equipped with winglets – these tabs at the end of the wing actually prevent the two airflows from uniting, creating a barrier and preventing vortices from forming. Because vortices cause drag, preventing them from forming reduces drag and causes the airplane to use less fuel.

It is always very interesting to see how flying and airplanes are improperly depicted in movies for the sake of entertainment value.  Something to think about.


Posted on

Pilot Perception: Runway Illusions

On Final

The “softer” side of flying is the human factors side. As advanced as modern aircraft are, pilots are subject to various factors that can cause them to make excellent decisions and judgement calls but sometimes make decisions that can be potentially dangerous. Luckily, illusions pilots experience are well understood and documented.  We know when we may experience an illusion.  In instrument flying for example, we learn how to ignore what our body is telling us – for example, that we are in a steeply banked turn when we are in fact in level flight – we learn how to trust our instruments in IMC.   Sometimes the message our body is telling us can put us in danger if we subscribed to it.

We are governed by the messages our body is sending to our brain.  This affects our flying and our perceptions of certain situations.  When we are approaching a runway with a up or down slope, or when we are approaching a runway that is level but the terrain before the runway is up or down sloping, it is possible and expected to incorrectly plan our approach.

Runway illusions are very common in flying, and are the result of our brain telling us something other than what is actually happening because it is extrapolating on what it sees.

Runway slope illusions. Image courtesy of americanflyers.net

When a runway is upsloping, the pilot thinks that the runway continues on an upslope from the terrain before it, hence thinking the terrain in front of the runway is upsloping as well.   The pilot will judge their altitude as too high, because they perceive the terrain continues on an upsloping, positive angle towards the runway  and will consequently plan a low approach that can cause landing short of the runway.

The solution? When flying toward a known upslope runway, expect that you will perceive being higher than you actually are and plan to land long on the runway.

When a runway is downsloping, the pilot thinks that they are too low and will consequently plan a higher approach and land long on the runway, or may even have to overshoot.   This is again, because of extrapolating on the slope of terrain before the runway.  Thinking that the terrain continues on a downslope towards the runway, means that the terrain is actually higher away from the runway than on the approach path; so that the entirety of the approach path follows downsloping terrain.  The pilot will incorrectly judge altitude as being too low when in fact he is too high.

The solution to planning an approach on a downsloping runway is to anticipate feeling like you are too low and plan to land short of the runway.

Also, when the runway is level but the terrain before the runway is upsloping: the pilot will extrapolate the same way.  They will think the runway is upsloping as well, and be subject to the same upslope illusion, and should plan to land long.  Alternatively, when the runway is level but the terrain before the runway is downsloping, the runway will also be judged as downsloping, and the pilot should plan to land short to avoid an overshoot.

It is hard to memorize the concept but I found that a good way of learning and remembering the concept is to draw an upsloping or downsloping runway and flat terrain in front of it. Then draw a straight dashed line following the angle of the runway towards the approach path, and this will be the pilots perception of the approach terrain.   From there we can easily imagine whether the pilot will feel too high or too low in each situation.

Rain on the windshield can create the the feeling of greater height and haze can make distances appear greater than they are. This is a favorite Transport Canada exam question as well!

Wide and Narrow Runway IIlusion
Wide and Narrow Runway Illusion

There is also the classic, wide and narrow runway illusions.  When a runway is narrow, this creates the illusion that the plane is higher than it actually is, resulting in a low approach and possible land short of the runway. With a wider runway, the opposite occurs, we perceive the plane lower than actual, and can cause the pilot to flare too high or overshoot the runway.

Writing a lot of exams lately, I noticed that Transport Canada likes to test these topics!

Posted on

Landing and departing at high altitude

El Alto International Airport, La Paz Bolivia. Image Courtesy of BolivaTravelSite.com

I read a post recently asking what is the highest altitude airport you have landed in. This reminded me when I flew into La Paz, Bolivia, landing at El Alto International Airport while on a backpacking trip in South America.  It was aboard a Lan Peru Airlines Airbus A319.   Though I wasn’t doing my pilot’s license back then, I was already very interested in flying, and did my research about this airport, knowing it was 4061 meters, or 13,325 feet above sea level.  If I wasn’t a climber that would have broken an altitude record for me just landing at an airport that high!

Cessna Citation XLS in Tibet, the world's highest commercial airport. Image courtesy of flightglobal.com
Cessna Citation XLS in Tibet, the world’s highest commercial airport. Image courtesy of flightglobal.com

The airport is one of the highest commercial airports in the world.  The runway 10R/28L at El Alto is 4 km (2.5 miles) long.  The only higher airport (that I could find) was Quam Banga Airport in Tibet, which is situated at an incredible 4334 meters – 14,219 feet above sea level! The runway there is an amazing 5.5 km (3.4 miles) long!

In order to land at El Alto, an aircraft must be equipped with special tires in order to be able to handle to high take off and landing speeds.  Only certain airlines provide service to this airport as the aircraft must be modified.

How else does high altitude affect airplanes? Well recall that the higher up we go, the lower the pressure.   Hence higher up the air becomes “thinner” and is less dense.  Denser air results in better aircraft performance.  In fact the four worst possible take-off and climb performance are when the following factors are combined:

1)  Air Temperature is high (above 15 degrees C)

2) Airport elevation is high

3) Atmospheric pressure is low (below 29.92 inches of Mercury)

4) Relative humidity is high.

So why the long runways at these airports? El Alto has a runway that is 4 km long. This is because due to the low pressure that exists at this extreme elevation there is reduced air resistance.  It is harder for the aircraft to slow down, and takes more time. The descent into this airport was noticeably short – the massive mountains looming on each side of the plane, and then before we knew it, the plane was close to the ground, which what felt like a disconcertingly high airspeed. It took a very long time to stop!

Since the highest altitudes on earth are mountainous, it is no surprise that these high altitude airports are surrounded by some pretty massive peaks. In Bolivia, among many other high mountains, Mount Illimani is in the area and looms over La Paz at 6438 meters (21,122 feet).  These mountains create obstacles that need to be cleared. Though they are far away, we learn obstacle clearance on take-off and landing for this reason.

Posted on 3 Comments

The short field takeoff and landing with obstacle

Approach and landing over an obstacle

The next maneuver, after mastering the short field procedure, is doing so imagining  having to clear a 50 foot obstacle on both take off and landing. This is accomplished by imagining that there is a 50 foot obstacle at the end of our runway on the takeoff, and that there is a 50 foot obstacle on the start of our runway on the landing.

This short field takeoff and landing with obstacle procedure builds on the skills practiced in the short field takeoff and landing with no obstacle. The objective is to use as little  runway as possible to land and take off, but also to accurately plan our clearance point.  On the takeoff  we need to become airborne as soon as safely possible and climb as fast as possible so we clear our obstacle. This means we need to use Vx, our best angle of climb speed.

On the landing, we have to plan it so we approach so we clear the obstacle and at a proper speed so we still have enough runway to  stop.  The obstacle approach will have us touching down further down the runway then we would if we didn’t have an obstacle to clear, so we have less usable runway. We want to be at a slow enough speed commensurate with safety so we can stop with enough runway.

Ask for clearance

Since I fly out of Springbank airport, which is a controlled airport, I ask for a short delay on departure when I’m holding short of the runway.  In this procedure we line up at the very end of the runway – “on the button.”  Like the short field, we apply full brakes add full power, carb heat cold, check the engine and mixture (if required) and release the brakes.

The speed at which we rotate – or take off – will be given in the aircraft’s POH.  The POH will also give us the climb out speed. For the aircraft I learned on, GSKF, a Cessna 172 N, this is 46 knots. Note that the speed will change with respect to the aircraft’s weight – this is all given in the POH. The POH will also tell you if you need flaps or not for the procedure. For our aircraft I used 10 degrees of flaps.

Short field takeoff and climb with obstacle

Steeper climb-out angle

The main difference is we climb out at a much steeper angle than we did when we didn’t have an obstacle.  This causes the stall horn to sound – which I found disconcerting – but remember, the stall horn sounds 5-10 knots before the stall, so you will have time to ensure you control your speed, and on take-off, our speed is increasing, not decreasing.  Be aware, even though it takes a big longer to stall the aircraft at such high power settings, if you do, this is the dreaded departure stall.

Note clearing the obstacle

We need to mentally ‘note’ where the obstacle is, and to say “clear the obstacle’ once we have cleared it.  At Springbank, the altitude is 3940 feet, so once we are approximately at 4000 feet we announce we are clear the obstacle. The same follows, at 200 feet AGL we announce two positive rates and retract our flaps if we are using them.

More controlled, power-on approach required

The approach for landing is similar to the short field, with flaps – however the objective is to use a power on approach so once we reduce power to idle once we are are clear the obstacle.  We try not to approach too high initially so we decrease power to idle too soon – I made this mistake a few times while practicing, and on the flight test, the examiner wants to see that you know to decrease power once you are clear the obstacle, so they see you understand this is what you are trying to accomplish.

Once clear the obstacle which we imagine is at the start of the runway, we announce it, reduce power, and loose the last bit of altitude, flare and touch down. When we touch down, we push the nose down, retract the flaps, and add heavy brake while applying full back pressure with the control column.

Learning this procedure is challenging, but it is A LOT of fun!

Posted on 1 Comment

Short field landing

Short field landing and takeoff procedure explained

At a certain point, your lessons will be about precision flying after you know the basics.  Now my lessons are about more precise flying, not only just about making it down to the ground safely.  Recently I was practicing to aim to land at a particular spot on the runway, using different flap configurations and no flaps.  This was to get used to being precise and prepare for the short field landing technique.

The other day I learned the short field landing method. There are two kinds of short field procedures, with an obstacle (we usually use a 50 foot obstacle) and with no obstacle.  We did the landing without obstacle and next we will do with obstacle, as that is more advanced.   The non-obstacle technique assumes that the runway is clear of obstacles (such as trees or power lines) so we don’t have to worry about clearing anything on our approach or take off.

The short field landing technique is a lot of fun to learn and practice.  It is a specialty procedure that comes in handy when landing at an airport with an unknown runway length or when there are concerns about usable runway length.

We want to plan to use as little runway surface as possible to both take off and land. So on the take off, we line up “on the button” meaning as close to the runway edge as possible.

Short field takeoff

For the Cessna 172, and our particular model, and at Springbank airport, we then follow this takeoff procedure:

  1. Apply full brake
  2. Flaps 10 degrees
  3. Full power
  4. Lean the fuel mixture (check), then mixture full rich
  5. Confirm engine gauges in the green
  6. Release brakes

Once the aircraft starts to roll we steer with rudder to maintain runway centre line. Depending on the aircraft model, we lift off at the recommended speed to fly in ground effect. The particular aircraft we were in, FDAJ, this speed was 46 knots.  We pull up to fly in ground effect, and then push down on the control column to keep from climbing and keep the aircraft level. We fly in ground effect a few feet off the ground without climbing until the airspeed builds to 60 knots, at which point we pitch up and climb out at 65 knots.  We let the aircraft gain 200 feet of altitude AGL. At Springbank the above sea level altitude is 3940 ft, so we wait until our altimeter shows 4140 ft.  We then check for two positive rates on the instruments: one on the vertical speed indicator (VSI) and the altimeter – that is, the VSI is above zero which means the aircraft is in a climb, and that altimeter is increasing which also means the same. We take flaps to 0 degrees, that will establish our speed to 70 knots, and we climb out normally!

Short field Landing

Then there is the landing, which is followed by a full flap approach. In our aircraft we used 30 degrees of flaps and approached at 61 knots as recommended in the aircraft’s pilot operating handbook (POH). We wanted to plan to touch down 500-600 feet after we flared so we look for appropriate runway markers for us to judge this distance. At Springbank, runways 16 and 34 have 500 foot and 1000 foot markers, so it is easy to see our targets.

After we touch down, we apply the brakes – hard. We push the nose of the aircraft down for maximum brake effectiveness and retract the flaps to decrease the lift also to really make those brakes effective.  The first few times I landed I wasn’t aggressive enough on the brakes but eventually got to pushing down on them hard enough. The application of brakes should be so hard you actually are pushed forward and can feel your seat belt.  This is because we are trying to use the minimum runway length possible.

It was really a lot of fun to learn this procedure and I’m excited to try this next time, this time I will be on my own.